Geodesic Foam Scenery Instructions
Previous Page
Commonly Asked Questions - Quick Help Guide
GEODESIC FOAM SCENERY ™ Developed by Joel & Jenny Bragdon
of Bragdon Enterprises
2960 Garden Tower Lane - Georgetown, CA 95634 PH (530) 333-1365 FAX (530)
333-1051
Developed May, 1995 Instruction booklet copyright, 1998.
Geodesic Foam Scenery™ ; a revolutionary, modern system for making strong, realistic, super lightweight scenery in any scale.
INTRODUCTION: Scenery made with the Geodesic Foam Scenery™ system is extraordinarily lightweight, reproduces incredible detail from rock molds and is practically indestructible. It is easy to make and it's economical and frugal in the use of materials. One square foot of the Geodesic Foam™ hard shell weighs two ounces and is far tougher than a full pound of plaster hard shell of the same dimensions. Add rock castings and the same square foot will weigh only four to six ounces. This system uses no plaster or any other heavy material and it is easy to work and color. Beautiful, convincing scenery can be quickly created rivaling the best plaster work which may weigh ten times as much.
The scenery terrain surface (hard shell) is a light, tough sheet of cast foam made over a ready made “mold” of poly bubble wrap packing material or fiberglass window screen fabric. The foam-bubble wrap-screen sheet weighs only one to two ounces per square foot. It can be formed to any contour and covered with any scenic material or with rock castings. Our unique method allows rock castings to be placed on the shell while they are still soft and pliable. They later set hard with a tough outer skin. Because the materials are so light in weight the hard shell panels and the castings can be made very large with ease. This allows scenery construction to progress at a very rapid pace; many times faster than with plaster, carved foam sheets or other traditional methods and materials. The resulting scenery is very strong but remains somewhat flexible. This resilient landscape is very resistant to damage.
MATERIALS LIST AND SUGGESTED SUPPLIERS.
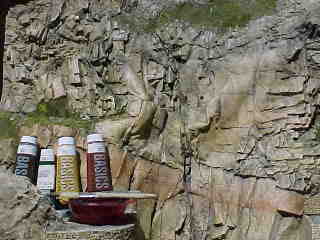
1. Two pound density polyurethane foam - Bragdon Enterprises.
2. Cast Satin™, white, odorless polymer casting resin. - Bragdon Enterprises.
3. Bench work materials, “Celotex, Tuff-R” or “Thermax” foam board or wood. - building supplier.
4. Petroleum jelly - grocer.
5. White gloss spray lacquer - hardware or paint supply.
6. Plastic drop cloth or tarp - hardware or paint supply.
7. 3/16” thick poly bubble wrap in sheet or roll - packaging supply.
8. Fiberglass bug screen - hardware supply.
9. Kitchen plastic wrap - grocer.
10. Paper cups - grocer
11. Disposable gloves - paint store
12. Stir sticks or plastic spoons - grocer.
13. 1 oz. plastic measured disposable cups. - restaurant or party supply.
14. Cardboard strips.- ½” X 4”, 4” X 4” and long 1” wide strips.
15. Plywood - 14” X 26” or larger. Optional.
16. Several bricks or similar weights. Optional.
17. Rubber rock molds - Model hobby shop, Bragdon Ent. or homemade.
18. Hot glue gun and glue sticks - Bragdon Ent., hardware or craft supply.
19. Staple gun (optional) - Hardware supply.
20. Artist’s acrylic gesso - art supply or Bragdon Ent.
21. Artist’s acrylic tube paint, Earth tones such as burnt sienna, burnt and raw umber - art supply.
22. Black powdered tempera paint. - art supply.
23. Rubbing alcohol (optional) - grocer.
24. Large sponge - grocer or hardware.
25. Pint spray bottles - grocer.
26. Assorted inexpensive stiff paint brushes - hardware or paint supply.
27. White glue or acrylic matte medium - hardware supply or art supply.
PLANNING.
Nothing saves time and frustration like a little advance planning. We suggest that you work out your track plan and structure placement on paper then make a small scale model of the entire layout or module project in modeling clay or card stock and tape. The model should be a rough approximation of the project and should be quickly made with little or no detail. This will allow you to visualize the landscape in 3-D and keep the number of unexpected surprises to a minimum as the full size project takes shape. We also recommend that whenever you are trying out new scenery methods and materials that you learn to use them by making a small test project or diorama before plunging into a large and more expensive project.
BENCHWORK.
There are a wide choice of materials for building benchwork. It is important
to keep in mind its purpose when selecting materials. Benchwork serves to
support the weight of the track and the scenery. The heavier the chosen scenery
materials, the beefier the benchwork must be. Any traditional material may
be used to support your railroad. Terrain built with Geodesic Foam Scenery™
can be massive but it will also be very light in weight. To keep the weight
to an absolute minimum you may chose to use no wood at all in benchwork
construction. Instead a non-styrene foam insulation board called “ Celotex,
Tuff-R” or “Celotex Thermax” or “Johns Mansville”
insulation board may be substituted for wood as a construction material.
This is sold in 4’ X 8’ sheets in a wide range of thickness’
and is available from building and roofing suppliers. It is easy to recognize
from its Styrofoam competitors by a tan foam core (occasionally cream or
black) and foil facing. It is usually priced competitively to a comparably
sized sheet of Styrofoam but it has several advantages. It is very strong
and rigid and is reinforced with glass fibers. It is easy to cut with a hand
saw or a serrated kitchen knife and knife cuts produce almost no dust. No
hot wire or power tools are needed. Pieces are joined with hot glue (or any
glue that you prefer). Unlike Styrofoam, “Celotex” and related
foam boards are quite fire resistant; while they will burn if exposed directly
to a very hot flame they will extinguish when the heat source is removed.
Also it does not melt when it is exposed to flame, hot glue or solvents.
There are other brands of non-Styrofoam board on the market also; they also
usually have a tan or black foam core with foil or paper covering both sides.
Fig. 1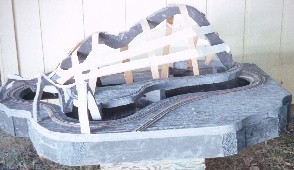
Foam boards are strong but have soft surfaces. Any foam board benchwork surface that will be exposed to abrasion should be covered with a thin protective veneer of wood, thin door skin plywood, Formica, styrene or mat board. The veneer can be attached with contact cement, spray glue, white glue or other adhesive.
A hot glue gun is an indispensable tool when working with “Celotex” type boards and Geodesic Foam Scenery™ the guns and glue sticks are inexpensive and are readily available from any hardware or craft supplier. Because the foam board is a great insulator it takes a few minutes for the hot glue to cool and set. If you want to speed up the assembly you may choose to tack the pieces together (after hot gluing) with spots of gap filling super glue and a quick set accelerator spray or pin them temporarily with pins made from stiff wire. This will hold the pieces together until the hot glue cools and bonds.
We recommend that benchwork, track and wiring be completed before adding scenery.
BUILDING SCENERY.
PROFILE AND LATTICE CONTOURS.
Hot glue or staple profile sheets of foam board or cardboard onto the benchwork
to form the limits of the mountains, canyons and other terrain contours.
Add a few long strips of cardboard and stick a masking tape lattice over
these to give the terrain some form. The contour areas may also be stuffed
with wads of newspaper to form and hold a particular shape. These methods
are the same as those used to form a base support for traditional plaster
hard shell and are covered in numerous books and articles on the subject.
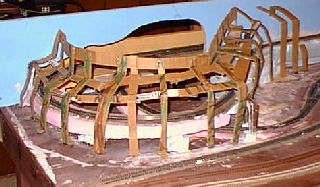 The main difference
here is that the Geodesic Foam Scenery™ shell is so light in weight
that it needs only a bare minimum of support.
The main difference
here is that the Geodesic Foam Scenery™ shell is so light in weight
that it needs only a bare minimum of support.
Fig. 2
ABOUT POLYURETHANE FOAM AND BUBBLE WRAP.
Foams are two part A-B liquid resin sets and are formulated to expand 30 to 40 times in volume when the parts are combined, then harden into a tough plastic foam. It is laminated with other materials that will contribute to the overall strength of the finished scenery while adding a minimum of weight. We do not recommend using the spray-can insulation foam sold in hardware stores for two reasons. First, it is much more expensive than its liquid counterpart and second, it comes out of the can as an already expanded, fast setting foam which is very difficult to control. Foam resins are temperature sensitive. This means that the user can control the working life of the product by controlling the temperature of the liquid resin. If the resin is cooled in a refrigerator or ice chest to between 50 and 60 degrees F the resin will react more slowly and give more working time. Cooling the resin before use is strongly recommended for beginners. The warmer the resin the faster it will react; giving less working time.
Bubble wrap is sold in a variety of sizes. We recommend the 3/16” (sheet thickness) material. Wrap with a thickness greater than ¼” should not be used as strength and working flexibility will be sacrificed. Bubble wrap is sold in widths from one to four feet. Bubble wrap is necessary only if the heavier duty hardshell is needed.
SCENERY SHELL.
There are two methods for making the hardshell. Both rely on tough, lightweight polyurethane foam resin as their major ingredient. Described first is a lighter duty hardshell typically used on small to medium sized indoor projects. Second is a heavier duty shell used primarily on outdoor projects and very large indoor work where floor to ceiling scenery is planned or where very high strength is required. We focused on this second method in our video “Creating Geodesic Foam Scenery”. We recommend that you learn both techniques so that you can compare their qualities. You can learn to handle the materials by making small practice panels one or two square feet in size.
Hardshell method #1. To make the standard duty hardshell begin by placing a piece of plastic kitchen wrap or thin plastic sheeting on a flat, smooth work surface. The plastic wrap should be a little larger than the hardshell panel that you plan to make. Cover this with a double layer of fiberglass window screen fabric that is slightly smaller in area than the plastic sheet. About two square feet is good for a first project.
It is best to wear disposable rubber or vinyl gloves while handling resins as the resins are difficult to remove from skin and may rarely cause an allergic skin rash in some individuals. It is also a good idea to cover tables and floors with disposable plastic tarps.
One ounce clear disposable plastic condiment cups are very convenient for measuring the resin. Mix only a total of one ounce of foam per square foot. For a two sq. ft. project one ounce of “A” and one ounce of “B” foam resins are needed. Pour a stream of mixed resin over the screen and squeegee it evenly over the surface with a four inch square of corrugated cardboard. Place another piece of plastic sheeting or film over this and press it and smooth it with your hands. Please note: window screen fabrics from different sources can vary slightly in thickness. These variations can affect the amount of resin needed for full coverage. You may need slightly less or slightly more than one ounce of resin to cover one square foot. The hard shell can now be lifted off of the work table and attached to the benchwork and contour boards with hot glue. The outer layer of plastic film should be removed after 10 to 15 minutes when the foam is soft set and no longer sticky. The shell panel will remain flexible for 20 to 30 minutes and the surface can be easily manipulated to set the exact contours that you want. The surface will stiffen in 30 minutes or so but will not reach maximum strength for at least 24 hours.
Additional panels can be made in any manageable size and attached and formed in the same way. Join two panels together by overlapping the edges slightly and bond with glue. If a very smooth joint is needed spread a thin bead of inexpensive acrylic/latex paintable bathtub caulk over the seam (we use DAP). Smooth the caulk with a damp brush or sponge. Many silicon caulks will not accept paint and are not recommended; check the label.
If you want grass or earth covered rolling hills and slopes and if no rock work is desired; the rigid foam shell is now ready to finish. Paint the shell with a coat of earth colored acrylic or latex paint and allow this to dry. Now brush undiluted white craft glue or acrylic matte medium over the painted shell. Select any desired loose ground covering materials such as ground foam turf, sand, decomposed granite, gravel or real dirt and sprinkle it onto the wet adhesive. Usually a combination of colors and textures gives the most realistic effect. The glue won’t be visible when it dries and the loose ground cover will be bonded to the hard shell. More information on ground cover is in the section on Final Detailing.
Hardshell method #2. This method produces a heavier duty hard shell and is recommended for outdoor projects and very large indoor scenery. This heavier shell uses bubble wrap packing sheets to control the expanding foam resin. It uses twice as much foam resin as its lighter duty counterpart. For learning purposes we recommend that you make a hardshell panel no larger than two square feet to begin with.
Start by covering a flat work surface with a plastic sheet or wax paper. Place a piece of 3/16” thick bubble wrap about 12” X 24” bubble side up on the work surface.
The bubble wrap serves several functions. First, it contains and controls the polyurethane foam resin while it is in a liquid and expanding state. Second, it serves as a mold to form the foam into a honeycomb grid sheet about ¼” thick that uses a minimal amount of the resin. Only enough to fill the space between the bubbles in the wrap is required. Additionally, a grid provides much better strength than a solid sheet of foam of the same thickness and dimensions while using less material. We named this scenery system Geodesic Foam Scenery™ because the underside of the finished grid of cast foam resembles Buckminster Fuller’s geodesic domes.
Next cut a piece of fiber glass window or bug screen about one inch larger than the piece of bubble wrap and set it aside along with a roll of kitchen plastic wrap or thin painter’s tarp sheeting.. About 2 ounces total of the polyurethane foam liquids will be needed for each square foot of bubble wrap to be covered. (1 ounce each of parts A and B per sq. ft). One ounce clear disposable plastic condiment cups are very convenient for measuring the resin.
It is best to wear disposable rubber or vinyl gloves while handling resins as the resins are difficult to remove from skin and may rarely cause an allergic skin rash in some individuals. It is also a good idea to cover tables and floors with disposable plastic tarps. A 12” X 24” piece of bubble wrap is two square feet so measure 2 ounces of each part of the foam resin. A and B are always mixed in equal proportions. While learning these procedures it is also important to use the resins at a temperature between 50 and 70 degrees F. Warmer temperatures will cause the foam to set very quickly. You can control the amount of working time you need by controlling the temperature of the resin. On warm days keep the resin bottles in an ice chest.
| Pour the two measured liquids into a larger paper or plastic cup and stir with a disposable stick for about ten to fifteen seconds. Immediately pour it in a thin stream over the bubble wrap in a circular or spiral pattern to distribute it as evenly as possible. Spread the liquid thinly and evenly to within ½” of the edge with a square of cardboard. It should not overflow the bubble wrap. Spread the foam as fast as possible because it will begin to expand quickly. Place the piece of fiberglass bug screen on top of the foam and cover it with pieces of thin plastic sheeting or kitchen wrap. Fig. 3 and 3a. Press the layers together with your hands (the plastic film will prevent the sticky foam from getting on your skin). An optional step is to place a piece of plywood on top and weight it with a heavy object such as a brick; a smoother finish may result. This needs to sit for 30 seconds or so to allow the foam to expand into the screen. | 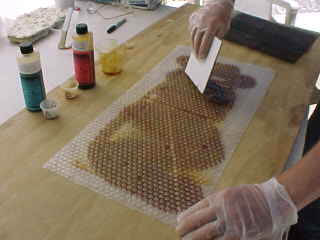 |
 |
|
| Fig. 4 The foam behaves something like waffle batter in a waffle iron; filling in the spaces between the bubbles to create a grid. Lift the soft, laminated bubble wrap/foam/screen blanket off of the work surface. It will remain flexible for about fifteen to twenty minutes depending on the temperature. This will give you ample time to apply it to the scenery forms and bench work. It can be attached whole or cut with scissors. Sometimes small pieces or narrow strips are needed to form over complex shapes. | 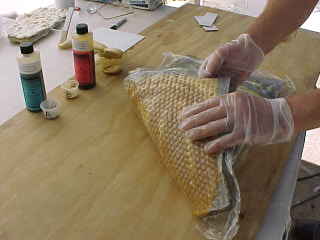 |
| The blanket must be attached plastic film/screen side up. Hold it in place with hot glue or a construction grade adhesive such as “Liquid Nails”. If your forms and bench work are made of wood it can be mounted with a staple gun. If you are working outside do not use hot glue as your primary adhesive because it will melt on a hot day. Outdoors use hot glue as a “spot welder” only; to quickly tack pieces in place. Use construction adhesive such as the Liquid Nails for the primary bond. Fig. 5 The profile boards, cardboard strips and wads of newspaper will hold the Geodesic Foam ™ sheet to the desired form until the foam sets hard. After a few minutes the plastic wrap is peeled off, exposing a fairly smooth foam surface. Additional sheets are prepared and attached to the forms and to one another by overlapping and gluing the screen boarder or edge of the laminated sheet. Fig. 6 | 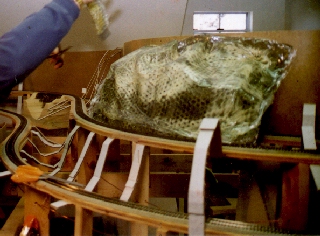 |
 |
|
| Seams and abrupt edges can be feathered out with paintable latex caulk if desired. Continue these procedures until the desired portion of hard shell is complete. Once a prepared blanket is applied; work can stop and resume as your pace. The foam will be stiff in a half hour or so. The shell will cure to maximum strength in about twenty- four hours. Paper wads and cardboard strips may be removed after the foam cures. | |
Large sheets can be made to cover broad areas in a very short time. It helps to a have an assistant when working with pieces over eight square feet. Groups of two or three people can prepare and handle very big pieces; as large as four by six feet or even more. A four by six foot area of plaster hard shell would require hours of labor instead of minutes and would weigh six to ten times as much.
If you want grass or earth covered rolling hills and slopes and if no rock work is desired; the rigid foam shell is now ready to finish. Paint the shell with a coat of earth colored acrylic or latex paint and allow this to dry. Now brush undiluted acrylic matte medium over the painted shell (white craft glue will work indoors). Select any desired loose ground covering materials such as ground foam turf, sand, decomposed granite, gravel or real dirt and sprinkle it onto the wet glue. The adhesive won’t be visible when it dries and the loose ground cover will be bonded to the hard shell. More information on ground cover is in the section on Final Detailing.
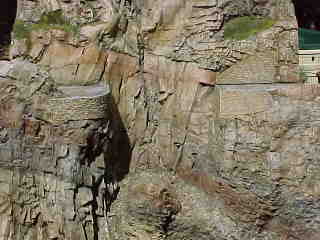
ROCK CASTINGS.
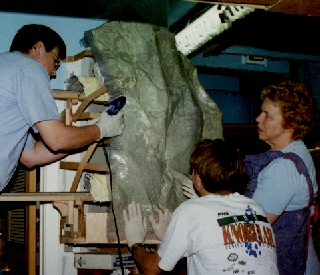
Where exposed rock cliffs, outcrops, cuts and retaining walls are desired; rock castings can now be made and applied to the hard shell. Light, hard rock castings are made in rubber molds using two different plastic resins in turn. An outer coating is first made in the rock mold from our Cast Satin ™ resin. This is an odorless, white polymer casting resin. This unique, specially formulated, fast setting resin reproduces every detail of the mold and produces bubble free castings of excellent quality (it also works great for casting cars, structures, portals and detail parts in rubber molds). Unlike the foam, Cast Satin does not expand. It sets into a hard solid plastic. Once the Cast Satin coating sets up to gel it is backed up with the same foam resin that is used to make the hardshell panels. This makes the casting strong but light. The casting is removed from the mold and applied to the hard shell while it is still soft and pliable. It sets hard in about half an hour. Castings may be applied to an already existing plaster hard shell or other scenery materials as well as to the Geodesic Foam ™ shell.
Rubber rock molds made from any material may be used. Commercial latex or vinyl molds or homemade latex or silicon RTV molds will all work well. Even molds of a very large size can be used because the casting materials are so light in weight that the molds can be handled easily. In fact if large areas of scenery need to be covered with rock castings, large molds will make the work progress very rapidly. While any mold will work, relatively flat molds rather than deep bowl shaped molds are the easiest to use.
You can make molds from liquid latex rubber by brushing the latex onto rocks, coal or “living” rock outcrops. Allow the latex to dry between coats. Most molds need four to six coats of latex before being peeled from the pattern. Bragdon Enterprises produces a huge selection of ready to use latex rubber rock and retaining wall molds.
Any molds that you plan to use must be coated with a mold release prior to
each use to prevent the Cast Satin™ from adhering to them. The best
method is to coat the mold with a thin, even layer of petroleum jelly. Rub
the jelly all over the mold with your fingers and work it into all of the
nooks and crannies. You may wear thin plastic or rubber gloves while doing
this if you do not want to get the jelly on your hands but don’t be
tempted to use a brush as you will get too heavy a coat of jelly on the mold.
 The coating of
petroleum jelly on the mold should appear a little shiny but should be otherwise
invisible. If there are visible globs of jelly continue to work it in. You
should be able to feel the slick, greasy coating on the rubber mold surface.
Next spray gloss white lacquer or other petroleum solvent based spray
paint all over the inside of the mold (do not use water based paint). Fig.
7 Lacquer is best because it dries quickly and the mold can be cast right
away. Spray lacquer is available at most Ace hardware stores or can be ordered
from Bragdon Enterprises. As the paint dries it combines chemically with
the petroleum jelly to create an excellent mold release that allows the casting
to be easily removed from the mold and leaves a non-greasy, paintable surface.
The used molds do not need to be cleaned but do need to be re-coated with
mold release just prior to each cast. There are a variety of mold release
sprays on the market; some of which will work well. They should be first
tested on the back of a mold before risking a valuable mold. Non-stick cooking
sprays and fabric protecting sprays such as “Scotch Guard” are
not very effective and are not recommended.
The coating of
petroleum jelly on the mold should appear a little shiny but should be otherwise
invisible. If there are visible globs of jelly continue to work it in. You
should be able to feel the slick, greasy coating on the rubber mold surface.
Next spray gloss white lacquer or other petroleum solvent based spray
paint all over the inside of the mold (do not use water based paint). Fig.
7 Lacquer is best because it dries quickly and the mold can be cast right
away. Spray lacquer is available at most Ace hardware stores or can be ordered
from Bragdon Enterprises. As the paint dries it combines chemically with
the petroleum jelly to create an excellent mold release that allows the casting
to be easily removed from the mold and leaves a non-greasy, paintable surface.
The used molds do not need to be cleaned but do need to be re-coated with
mold release just prior to each cast. There are a variety of mold release
sprays on the market; some of which will work well. They should be first
tested on the back of a mold before risking a valuable mold. Non-stick cooking
sprays and fabric protecting sprays such as “Scotch Guard” are
not very effective and are not recommended.
We strongly recommend that our Cast Satin™ resin be used for the next step because it is safe and was designed specifically to do this job. Like the foam resin the Cast Satin™ is temperature sensitive. The warmer it is the faster it sets; the cooler it is the more working time you will have. There are other casting resins on the market but most have some undesirable quality. They can set too fast or too slowly, stick to the molds, turn brittle or refuse to adhere to the foam. Most have a foul odor that can linger for months and some release toxic formaldehyde or other noxious fumes. Do not be tempted to cast your mold with the foam resin by itself. Polyurethane foams are very adhesive and will ruin your molds after a very few casts even with a mold release. Foams do not take mold detail well and the surface of the casting will remain soft and fragile.
It is best to mount the mold in a frame holder as described below or pin or clip it to a sheet of card board, plywood or foam core before casting. A mold frame can be simply four strips of thin wood glued or nailed at the corners. The frame should be a little larger than your largest mold. Loop some rubber bands over the sides of the frame and place a spring clothes pin over each rubber band loop. Clip the prepared mold into the frame with the clothes pins. It will look something like an animal hide in a curing frame. The frame is quick and easy to make and will allow you handle the mold during casting without spilling and wasting resin. The mold frame works best for molds up to about two square feet. Larger molds are more easily handled if supported on a sheet of thin plywood.
Fig. 8 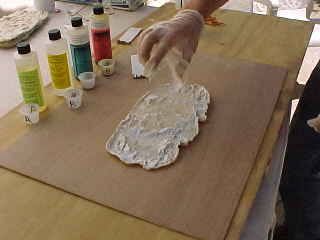 Very
small amounts of Cast Satin™ will be mixed; only enough to give a thin
coat to the mold. Usually an ounce or less is all that is necessary in a
typical 4” to 5” diameter mold. Of course the amount needed will
vary depending on the size of the mold. Also the amount and depth of textured
detail in the mold affects the surface area and thus the quantity of resin
needed. Only experience can guide you here but a good rule of thumb is two
to three ounces of mixed resin per square foot. Pour a small amount of A
and B Cast Satin resins into two small measuring cups (again, equal portions).
Pour these back and forth several times to mix them thoroughly or pour into
a third container and stir 10 to 15 seconds. Pour a thin stream of resin
around the inside of the mold. Make some brushes from 1” X 4” strips
of cardboard with a ½” long fringe cut into one end to serve a
s bristles or use short pieces of fiber rope as disposable brushes. Brush
the resin over the mold surface nearly (but not quite) to the edges. After
two or three minutes the resin begins to thicken into a heavy syrup. Pick
up the mold by its frame or board and carefully tilt and rock it to keep
the resin from collecting in the low spots. The resin will rapidly thicken
and turn a milky color in another minute or two. The idea is to coat the
mold with as even a layer as possible. At the point when the resin is still
slightly fluid but will no longer flow freely, the mold can be inverted.
This will help the high spots to get coated, but the resin will be stiff
enough not to drip out of the mold. Until you gain enough experience with
determining the amount of resin to use you may need to give the mold a second
coat. Usually this takes less resin than the first coat and you should
concentrate on covering the thin spots. Areas that are thick enough will
turn a slightly milky color.
Very
small amounts of Cast Satin™ will be mixed; only enough to give a thin
coat to the mold. Usually an ounce or less is all that is necessary in a
typical 4” to 5” diameter mold. Of course the amount needed will
vary depending on the size of the mold. Also the amount and depth of textured
detail in the mold affects the surface area and thus the quantity of resin
needed. Only experience can guide you here but a good rule of thumb is two
to three ounces of mixed resin per square foot. Pour a small amount of A
and B Cast Satin resins into two small measuring cups (again, equal portions).
Pour these back and forth several times to mix them thoroughly or pour into
a third container and stir 10 to 15 seconds. Pour a thin stream of resin
around the inside of the mold. Make some brushes from 1” X 4” strips
of cardboard with a ½” long fringe cut into one end to serve a
s bristles or use short pieces of fiber rope as disposable brushes. Brush
the resin over the mold surface nearly (but not quite) to the edges. After
two or three minutes the resin begins to thicken into a heavy syrup. Pick
up the mold by its frame or board and carefully tilt and rock it to keep
the resin from collecting in the low spots. The resin will rapidly thicken
and turn a milky color in another minute or two. The idea is to coat the
mold with as even a layer as possible. At the point when the resin is still
slightly fluid but will no longer flow freely, the mold can be inverted.
This will help the high spots to get coated, but the resin will be stiff
enough not to drip out of the mold. Until you gain enough experience with
determining the amount of resin to use you may need to give the mold a second
coat. Usually this takes less resin than the first coat and you should
concentrate on covering the thin spots. Areas that are thick enough will
turn a slightly milky color.
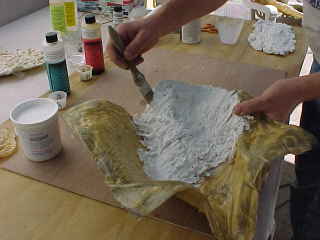
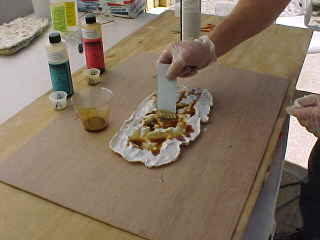 When the resin
is no longer fluid but is still sticky it is ready to be coated with a backing
layer of foam. Remove the mold from the frame and set the mold on your work
surface. Generally about 25% to 50% less foam is needed than the Cast Satin
that was used in the previous step. Pour the mixed foam resin over the soft,
gelled Cast Satin layer and spread it to nearly the edge of the Cast Satin
with another cardboard or a disposable rope brush. A thin yellow-brown layer
of foam is all that is needed. Fig. 9 The foam will expand in just
a few minutes to form a 1/8” to ¼” thick coat. The casting
is ready to remove from the mold when it is soft set. The foam should be
soft but dry to the touch. This should take between three and seven
minutes depending on the temperature. If it feels tacky wait a little longer.
Peel the soft, dry casting away from the edge of the mold all of the way
around. Then place the mold and casting, mold side up on a work surface.
The mold should be bent away from the casting with one hand while supporting
the still soft and fragile casting with the other. Gently pull the two apart.
The casting should be quite flexible.
When the resin
is no longer fluid but is still sticky it is ready to be coated with a backing
layer of foam. Remove the mold from the frame and set the mold on your work
surface. Generally about 25% to 50% less foam is needed than the Cast Satin
that was used in the previous step. Pour the mixed foam resin over the soft,
gelled Cast Satin layer and spread it to nearly the edge of the Cast Satin
with another cardboard or a disposable rope brush. A thin yellow-brown layer
of foam is all that is needed. Fig. 9 The foam will expand in just
a few minutes to form a 1/8” to ¼” thick coat. The casting
is ready to remove from the mold when it is soft set. The foam should be
soft but dry to the touch. This should take between three and seven
minutes depending on the temperature. If it feels tacky wait a little longer.
Peel the soft, dry casting away from the edge of the mold all of the way
around. Then place the mold and casting, mold side up on a work surface.
The mold should be bent away from the casting with one hand while supporting
the still soft and fragile casting with the other. Gently pull the two apart.
The casting should be quite flexible.
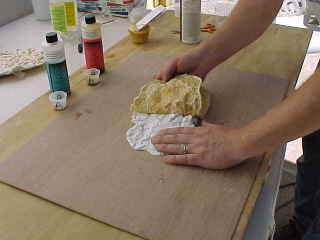
| Fig. 10 and 10a. The casting is now ready to apply to the hard shell scenery base. Decide where the casting is to go and in what direction it will lie. You may cut or tear the casting into smaller pieces and use them in several places. Turn the casting face down and apply a bead of hot glue or Liquid Nails around the edge of the casting and some across the middle. Turn it over and press it onto the hard shell before the glue sets. Be careful as hot glue can burn your fingers. You may want to wear gloves or use a blunt stick while pressing the hot glue/casting in place. The possible size of the resin/foam rock castings is limited only by the size of the mold used. It is no more difficult to cast a large mold than to cast a small one once you have some experience with the materials and methods. Large castings make it possible to cover a large area in a short time. |
 |
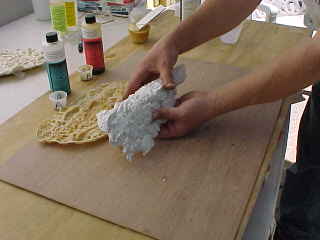 |
Additional castings may be made and applied at any time. The castings can be overlapped slightly and joined to make a rock wall that appears seamless. The rock castings come out of the molds with jagged, irregular and flexible edges. This is desirable and will aid in camouflaging the edges of adjoining castings so they appear like a solid, seamless rock face. A little extra glue will be needed particularly at the seams to hold the still soft, flexible edges of the overlapped castings tightly together. The castings will remain soft and pliable for ten to fifteen minutes after coming out of the mold. They can be kept soft longer if necessary by keeping them warm with hot air from a hair dryer or electric hot air gun.
As confidence and skill are gained with these processes several castings can be made at once and the work can proceed at a more rapid pace. The finished castings have a hard, durable surface but they can be easily cut or drilled. If a resin rock cannot be used right away it will harden and will no longer be flexible enough to form. It can be re-softened at any time (even years later) by heating it with a hot air gun (on low heat) or a hair drier (on high heat) and then applied to the scenery base with glue.
Use a little paintable latex caulk here and there to fill small gaps, smooth transitions between castings and other areas and also to create roads and trails. Apply the caulk with a brush or a small spatula or stick. Latex caulk is easy to smooth with a damp brush.
You can cut, drill, alter and patch your Geodesic Foam Scenery™ easily and at any time add structures or make other changes from your original plan.
If you are working out of doors keep in mind that hot glue will re-soften on a hot day so a construction grade adhesive such as “Liquid Nails” should be used instead.
A second but slightly more difficult method for making castings is to apply the Cast Satin only to the mold as described above. The Cast Satin shell needs to be applied as a layer of very even thickness and generally the coat must be a little thicker than that needed with the previously described casting method; otherwise it may tear while you are removing it from the mold When it has set to the flexible, leathery stage (about 10 to 12 minutes) it can be gently removed from the mold. While the delicate shell casting is still soft it may be filled with foam and put onto the scenery base. A very small amount of foam is mixed. The exact amount needed will vary with each mold so again experience will be your guide. Keep in mind that the foam expands many times in volume. When the foam is mixed, a thin layer is poured and spread over the inside surface of the casting. As it begins to expand it is placed onto the scenery base. It will stick and will be soft enough to conform to the contours. Large castings may need a spot of hot glue here and there to hold them in place. As the foam sets, the casting should occasionally be pressed to be sure that it is firmly set and in the desired position. If too much foam is used it will leak out around the edges. Also some may ooze out of small holes in the castings. This excess foam can be easily scraped away. We recommend wearing protective gloves while you are handling liquid or sticky foam resins. The main advantage of this second casting method is that no additional adhesive is necessary.
Castings that will have little depth such as retaining walls in the smaller scales do not necessarily have to be backed with foam at all. The Cast Satin casting may be attached with glue.
PAINTING THE SCENERY.
When the hard shell and rock castings are in place it is time to paint your scenery. Painting the scenery is the most important step in making it look convincingly realistic. It is quick and easy to do if you use the right materials. Scenery painting is often a little intimidating to model makers who have had little or no art training. We have developed a system that works and will give you professional quality results even if you have never held a brush in your hand. Just use the recommended materials and follow the steps below.
Before you begin painting, consider the lighting conditions under which your scene will be displayed. Colors appear many times darker in artificial light than they do in sunlight. They also look different under incandescent light than they do under florescent light. Whenever possible it is best to paint your models under the same lights that will be used for displaying them.
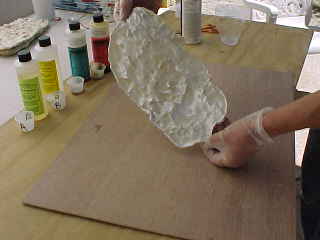
We do not agree with the common school of thought that suggests that rock work should be painted with flat latex wall paint or opaque spray paints. These paints are designed to be washable and to resist stains; they really are not an ideal primer coat for coloring model scenery. Colored, opaque latex wall paints are definitely not suitable for finishing model rock castings. Instead we recommend priming your rock castings with white artist’s acrylic gesso. Gesso is designed specifically to accept paints and stains with ease, subtlety and control. It is what artists use to prepare a surface prior to painting a picture. There is very little difference between the inexpensive house brands of gesso and the more expensive name brands. Gesso is available in art supply stores or by mail from Bragdon Enterprises.
Apply the gesso full strength to the rock castings with an inexpensive stiff
brush. Gesso is not
 needed on the
bare hardshell areas that are to be finished with ground cover. As the gesso
begins to dry, brush it out of any deeper pockets where it tends to accumulate
in your castings. You will need a thin, even coat. Be careful not to cover
subtle details in the rock castings with a thick layer of gesso or they will
be hidden. Allow the gesso to dry thoroughly before continuing to
paint your scenery. Clean your brush with soap and water. Fig. 11
needed on the
bare hardshell areas that are to be finished with ground cover. As the gesso
begins to dry, brush it out of any deeper pockets where it tends to accumulate
in your castings. You will need a thin, even coat. Be careful not to cover
subtle details in the rock castings with a thick layer of gesso or they will
be hidden. Allow the gesso to dry thoroughly before continuing to
paint your scenery. Clean your brush with soap and water. Fig. 11
Full size rock outcroppings in nature are large enough to create deep shadows and strong light and dark contrasts. Your miniature rock castings are too small to do this without some help. There are several ways of creating the illusion of shadow in miniature. One commonly prescribed method is to first color the rocks and then spray them with a mixture of rubbing alcohol or water and India ink. The ink wash collects in the deeper areas and crevices and makes the detail stand out. The drawback of this method is that the ink darkens everything and is hard to control. You won’t know the final shade and darkness of the rock color until the ink dries.
A better, more controllable approach is to create the shadows first with black powdered tempera paint, before the other colors are added. Dry tempera (sorry, no tempura) is available from Bragdon Enterprises and in some art supply stores. Dry tempera is the same material that is mixed with water to paint signs and decorations on store windows.
| With a stiff one inch dry brush apply the dry
powder to the dry gesso covered rock castings and brush it in. At this point
the rocks will be gray-black; as if covered with a layer of soot. Fig.
12 Next mist the tempera with water from a spray bottle. Then use a damp
sponge and water and wash as much of the tempera as possible from the rock
castings. Rinse or change sponges often. Leave the dark tempera only in the
crevices and areas that would be in deep shadow. About ninety percent should
be cleaned away leaving white gesso exposed and some very strong contrasts
of light and dark. Fig. 13
When the scenery is completely dry it is ready for some color. Begin by squeezing very small blobs of four or five different colors of earth tone acrylic artist’s tube paints onto the rim of a plastic bowl or cup. This is your palette. These colors will vary depending on the region and type of rock being modeled. Burnt and raw umber, burnt and raw sienna, yellow oxide, Payne’s gray and perhaps dark blue and green will handle nearly any situation. Fill the container about half way with water. Fig. 14 |
 |
 |
|
 |
Using a stiff one inch brush touch the tip of the bristles in one color, getting only a small speck of paint on the brush. Then dip the brush in the water. Brush it randomly onto a rock casting. The acrylic colors will combine with a little of the black tempera giving a pleasing, slightly grayed look. If the color looks too intense, brush on more water. The idea is to apply very, very thin washes of transparent color. Use several or all of the colors applying them randomly. Allow them to bleed and overlap somewhat. This first thin coat should dry before continuing. Add several layers of very thin, transparent washes in the same manner. Use several different colors on each wash coat. Greater depth, subtlety and realism is created by building up the color with layers of washes rather than with on or two heavier coats of color. You cannot put on too little paint because you can always add more. Allowing the paint to dry between layers gives you more control.
Vary the colors as you apply them over previous layers. In other words do
not put yellow over
 yellow or brown
over brown. Which colors you use, and in what order does not really matter
with the first couple of coats as long as there is some variety. When you
apply the third or fourth coat think more about the final colors that you
want and begin to define strata, streaks and other details. It is important
to keep in mind that each layer of color is making everything darker; be
conservative with the intensity. By applying the color in thin transparent
layers the rock work will take on a luminosity, richness of color and appearance
of realism that cannot be achieved in any other way! The color can be lightened
by washing it with rubbing alcohol. If you do not like the colors that have
been applied, the scenery may be re-coated with gesso and painted again.
yellow or brown
over brown. Which colors you use, and in what order does not really matter
with the first couple of coats as long as there is some variety. When you
apply the third or fourth coat think more about the final colors that you
want and begin to define strata, streaks and other details. It is important
to keep in mind that each layer of color is making everything darker; be
conservative with the intensity. By applying the color in thin transparent
layers the rock work will take on a luminosity, richness of color and appearance
of realism that cannot be achieved in any other way! The color can be lightened
by washing it with rubbing alcohol. If you do not like the colors that have
been applied, the scenery may be re-coated with gesso and painted again.
It is not difficult to master these coloring methods with a little practice. We recommend learning on a small section of scenery or on a small diorama. Practice until you are satisfied with the results. The thin film of color that you add to your model scenery is the most important single aspect of making your miniature world convincing to the viewer.
FINAL DETAILING.
When the paint is dry and finished to your satisfaction it is time to add ground cover, trees, water, figures and details. If you have left areas of the foam hard shell without a covering of rock castings you can give them the appearance of bare earth or grassy hillsides by sprinkling granulated ground covering materials over a white glue or acrylic matte medium coated surface as described at the end of the section on making the hard shell. For tall grasses and weeds glue down any of the variety of model grass mats that are sold in hobby shops or individual tufts made from natural plants or fiber rope. For bare earth and aggregates nothing beats the real thing. Some loose earth, sand and gravel in appropriate colors may be collected in the wild in your area. A wide variety of ground cover and aggregate products are available in hobby shops.
Heavier accumulations of loose materials collect as tallus piles at the base of cliffs or as screed on steep slopes. You can also prepare stream and river beds with loose gravel, small stones, twigs and other debris. An under coat of glue or matte medium alone will not hold all of the loose material in place. Spray over all of these areas (after the undercoat of glue is dry) with a light spray of “wet water” - a mix of a pint or so of water and a drop of liquid dish detergent. This will penetrate and dampen even thick accumulations of the surface soils. Next spray with a mixture of approximately 30% white glue or matte medium and 70% “wet water”. This will soak in and when dry, hold everything down with an invisible bond. This same procedure can be used to hold track ballast in place but be sure to protect turnout points and moving parts from the glue spray.
If you are planning to add “water” this is the best stage at which to do so. There are many choices available for modeling water. Regardless of what material you choose be sure that the water’s bed is completely sealed to prevent leaks. For deep water such as streams, lakes and harbors we suggest using casting resin. Either polyester or epoxy resins will work. Polyester casting resin is the least expensive and the easiest to use but it has a foul odor that lingers for several days. It is best to pour it out of doors or in a very well ventilated room. Epoxy resin does not have the smell but costs more and most brands yellow slightly with age. Either are available from craft and hobby suppliers. Most casting resins shrink a little as they cure so it is best to pour several thin layers. Limit the pours to one quarter inch or so rather than thicker ones which may develop shrink cracks. Dyes added to the resins are generally not recommended because these colors are difficult to control and results are often unnatural looking and unpredictable. Better control is maintained by painting the bottom of the stream bed or pond allowing the color to show through the clear resin. Paint the bottom of deeper areas darker and feather the color with lighter shades toward the water’s edge. Puddles and shallow water are easy to model with artist’s acrylic gloss varnish. It is water base and air dries rather slowly so is best when used for shallow water. Acrylic gloss varnish is also great for representing rapids and waves because it holds its shape without settling flat after it is brushed on. It can be applied over your thicker pours of casting resin to create texture and also to seal in the odor released by polyester resins. After it dries the high points may be dry brushed with a very small amount of white paint to represent white water or foam.
Geodesic Foam Scenery™ is all plastic so it is waterproof. Real water may be used. Paint colors should be sealed with a clear waterproof varnish. All electrical wiring must be protected from the water.
Using realistic miniature trees is important to create a convincing landscape. Quality models are enhanced when they are in settings with natural looking trees and diminished when the trees are toy-like. Excellent deciduous trees can be made in a wide range of scales from kits called “Forest In A Flash” by Jane’s Trains. These kits come in an assortment of colors and styles and use a soft, tough preserved plant with tiny “leaves” and delicate looking branch structure and they are easy to assemble. Several branch and leaf pieces are bundled together and the stems are coated with white caulking to represent the tree trunk, surface roots and bark. When the caulk is dry the trunks are painted. These are very nice trees and surprisingly durable.
Realistic evergreen trees can be made from “Finescale Forest” kits and materials from Bragdon Enterprises. These have tapered and bark textured trunks and unique natural branches. Evergreens look even more realistic if a few dead branches are added below the green growth. Dead wood is easy to represent by gluing small plant roots to the trunks. The roots should first be cleaned and painted gray. A few dead and dying trees, trees with double tops and burnt out trunks will all help to make a miniature forest even more believable.
Clutter, details and figures are very important in creating interesting and convincing scenes. These small details are fun to add and to change as long as you have your railroad. Detail parts and clutter and figures are available from a very wide range of sources. Most detail parts and some structures can be held in place with a repositionable glue such as Aleen’s “Tack-It Over And Over”.
Geodesic Foam Scenery™ is fast, easy and fun to make. Not only is it stronger than traditional plaster scenery but it is so light that it should give new freedom to module builders who want to make massive, realistic, mountain railroads that are light enough to transport effortlessly. Model builders making “permanent” layouts can reduce the mass and weight of the scenery support structure and will be able to move layouts in sections and reassemble if the need arises. Best of all the results look great.
We are happy to give technical assistance by phone between 8AM and 7PM PST. (530) 333-1365.
In addition to our stock of Geodesic Foam Scenery supplies and molds we have two informative, one hour, all color instructional videos which will make your modeling easier and more enjoyable. Both are very reasonably priced.
#FF-71 CREATING GEODESIC FOAM SCENERY. The methods described in the preceding instructions are demonstrated. We begin by making the hardshell and covering the benchwork and contours to create mountain forms. Next rock castings are made and placed on the hardshell and castings are blended to form a rock face. Finally the painting and finishing steps are covered in detail.
#FF-72 RTV MOLD MAKING AND RESIN CASTING FOR THE MODEL MAKER. This comprehensive video demonstration will teach you everything you need to know about silicon RTV mold making and producing finished parts from modern, user friendly plastic resins. One piece molds, two piece molds, gang molds, split molds and large molds are all demonstrated. Casting solid, hollow and foam filled are shown as well as casting with inclusions such as metal tubes, rods or wood dowels. All of the techniques are easy to learn and require no expensive equipment.
The following are brand name trademarks belonging to BRAGDON ENTERPRISES: Geodesic Foam Scenery™, Super Scenics™, Sierra Super Scenics™, Cast Satin™, Black Shadow™, Finescale Forest™, Weather System™,